
Autoguiding Tutorial with PhD2
A quick guide to get you going:
Autoguiding is an essential technique in astrophotography that helps achieve pinpoint sharpness and reduce the effects of tracking errors during long-exposure imaging. PHD2 (Push Here Dummy 2) is a popular free autoguiding software that works with many equatorial mounts and guide cameras. In this tutorial, I'll walk you through the process of setting up autoguiding with PHD2 for astrophotography.
Prerequisites:
A computer with PHD2 installed.An equatorial mount with guiding capability (e.g., Celestron, Sky-Watcher, or other compatible brands). A guide camera with a suitable guide scope. Your main imaging camera and telescope. A suitable target and clear skies.
1: Mount and Telescope Setup
Set up your equatorial mount and telescope according to the manufacturer's instructions. Ensure that the mount is correctly polar aligned. You can use a polar alignment tool or software like SharpCap or PoleMaster to achieve accurate polar alignment.
2:Guide Camera and Guide Scope Setup
Attach your guide camera to your guide scope. Mount the guide scope and camera on your main telescope. Make sure they are securely attached and aligned properly.
3: Connect the Hardware
Connect your guide camera to your computer using a USB cable. Connect your equatorial mount to your computer using the appropriate interface (e.g., ASCOM, EQMOD, Native Driver and a dedicated mount cable).
4: Install PHD2
Download and install PHD2 from the official website (https://openphdguiding.org/) Launch PHD2 after installation.
5: Configure PHD2
Go to the "Equipment" menu and select "Mount." Choose your mount's model and establish the connection.
In the "Camera" section, select your guide camera model. PHD2 should automatically detect and connect to your camera. Ensure that the camera's pixel scale is set correctly, as this affects guiding performance.
Click on the "Connect" button to establish the connection with your guide camera.
In the "Telescope" section, select your main imaging telescope's model. Establish the connection with your telescope.
6: Calibrate PHD2
Go to the "Guiding" menu and select "Calibration Wizard."
Follow the on-screen instructions to calibrate PHD2. This process involves guiding the mount on a few guide stars to determine the mount's guiding parameters.
7: Start Guiding
Once calibration is complete, go to the "Guiding" menu and select "Loop."
PHD2 will capture a short exposure and display guide stars. Select a suitable guide star by clicking on it. PHD2 will automatically start guiding.
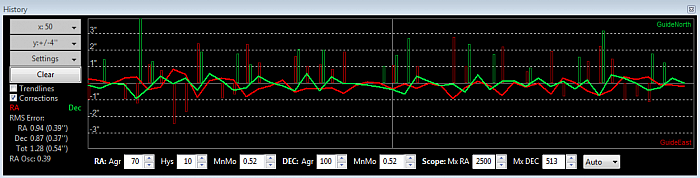
Monitor the guiding performance in the PHD2 interface. Aim for a guiding error (typically measured in arcseconds) of around 1" or less for precise imaging.
8: Imaging
Open your imaging software (e.g., NINA, Sequence Generator Pro, BackyardEOS, or APT) and start capturing images as usual.
PHD2 will continuously adjust the mount's position to keep your guide star centered, compensating for tracking errors.
9: Troubleshooting
If you encounter guiding issues, such as periodic error or drift, you may need to fine-tune your PHD2 settings, polar alignment, or mount. PHD2 offers advanced settings for guiding, including guiding algorithms, aggressiveness, and more.
10: Post-Processing
After capturing your astrophotography data, perform any necessary post-processing using software like Adobe Photoshop, PixInsight, or DeepSkyStacker.
Remember that autoguiding with PHD2 may require some trial and error to achieve optimal results. Practice and experimentation will help you fine-tune your setup for the best possible astrophotography images.
