
Accessories used on my imaging set up
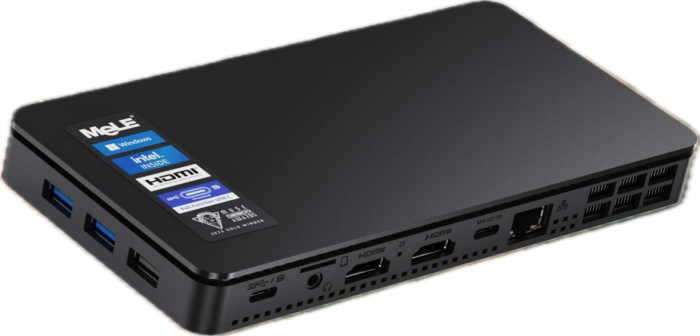
Mele Overclock 4C Mini PC, for full system control
This is the Mini PC I use to control my full imaging rig, the Mele Overclock 4C, it’s the 4th of the Mele mini PC generations, and the first with a built in fan, which makes it slightly larger than its predecessors. it sits in the front of my pier, and I connect wirelessly to it from indoors over windows Remote Desktop. Everything is controlled from this and it works extremely well, all my imaging softwares such as, NINA, PHD2, Sharpcap, Stellarium, ASTAP, Pixinsight and many more are installed on the internal 500gb SSD drive. See my YouTube video for full review on this mini PC
- 500gb Nvme SSD hard drive (added)
- 240gb EMMC hard drive (original)
- 32gb RAM (max 32gb)
- Intel Celeron N95 processor (overclocked)
- 2x USB 3 ports
- 1x USB 2 port
- 1x USB type C port
- 1x USB type C port for 12v power input with PD
- 2x HDMI port
- 1x Gigabit Ethernet network port
- 1x 3.5mm Headphone jack
- 2.4ghz & 5Ghz Wi-Fi
- 1x Micros SD card slot

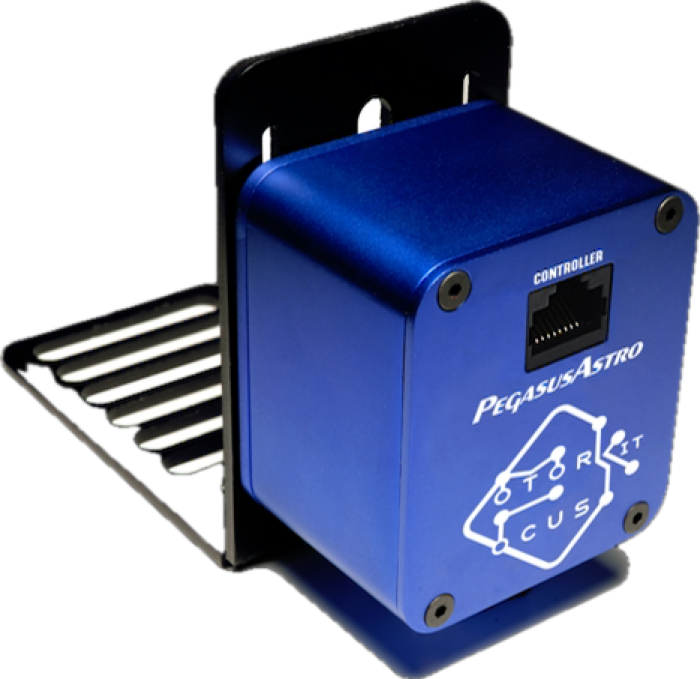
Pegasus Astro Ultimate Power Box V2
This is one of the best accessories I ever bought, The Pegasus Ultimate power box V2, this is the 2nd version which is smaller and more compact. It powers all my rig and provides the all the connections I need, and more. Fully controlled from its own software app and also has an ASCOM driver so works from within programmes such as NINA. From within the app, everything can be controlled, and also you get full information of the conditions outside such as dew, humidity and temperature, as well as showing all power being used in total and from each port. Firmware is upgradeable from within the app too.
- 6 port USB powered hub with 4x USB3 ports and 2x USB2 ports.
- 1x USB 3 PC connection port
- 1x 12 power input
- 4x 12v power ports
- 3x Dew heater ports.
- 1x Stepper focus motor controller port.
- 1x variable 3v to 12v power port.
- 1x always on unregulated power port.
- 1x Ext port for my Temp, Dew & humidity sensor
Pegasus Astro Motor Focuser
This is the automated focus motor I use on my main telescope, it allows for very precise autofocus curves to be achieved from within the auto focus routine in NINA, and give me pinpoint stars time after time. Connects directly to my Pegasus power hub with a single 8 core network type cable.
Focus accurate and fast your telescope using our powerful Motor Focus Kit v2. This high resolution geared box has a 0,06 degree step size can can easily lift more than 6 Kg (per cm). Its high torque is suitable for lifting heavy imaging equipment. Moreover motor’s gearbox has a low backlash which can easily tuned using backlash compensation in imaging software. The RJ45 socket can be converted to compatible Robofocus Pinout.
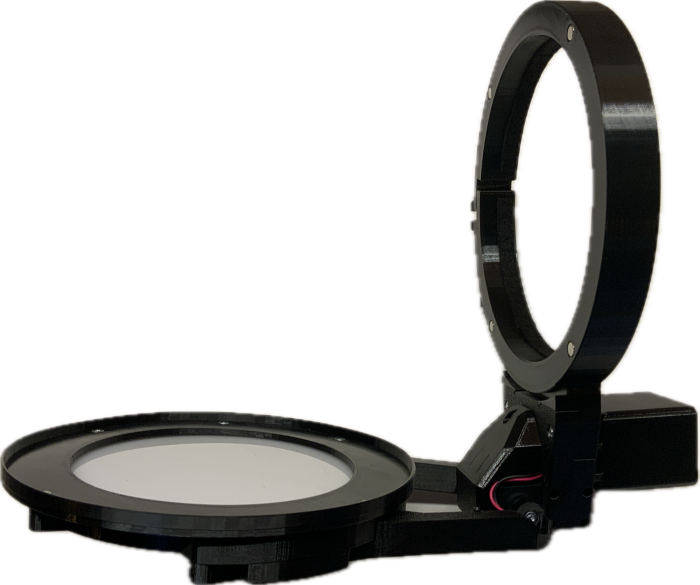
Deep Sky Dad, motorised flats panel
The Motorised flat field panel from Depp Sky Dad, perfect for fully automated flats, fits to the end of the scope and is software controlled with an ASCOM Driver, acts as a scope cap when closed, 4096 light settings so can be used with the narrowest of narrowband filters without issue.
See My YouTube video page for a full review of this.
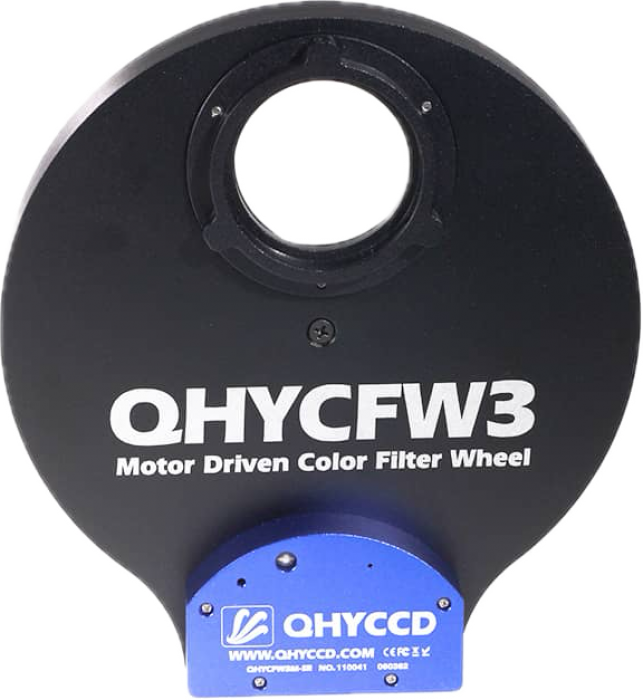
QHY 7x36mm Filter Wheel
On my Mono QHY268 camera i have this filter wheel, it bolts directly to the front and is a great accessory, holds 7x36mm unmounted filters which is the size I use, and works extremely well.
The QHYCFW3-M-US (7 x 36mm) Colour Filter Wheel is the perfect addition to the QHY268M camera and many others with APS-C and smaller Sensors.
- Thickness - 17mm
- Internal Height - 5.5mm
- Weight - 691
- Disk - 7 x 36mm Filters
- Interface - Female M54 (Telescope Side) + Bolt on System for QHY Accessories
- Interface - Dovetail / Bolt on System for QHY Cameras + M54 Female (Camera Side)

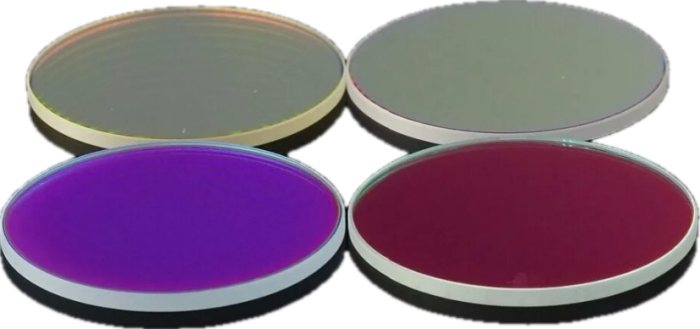
Optolong ultra narrowband 36mm Unmounted 3nm Ha, OIII, SII Filters
These are the current filters I am using, Optolong ultra narrowband SHO 3nm, 36mm unmounted, they are really good and a big difference moving from the 6.5nm version i had previously. Much more signal comes through and a lot less light pollution.
Narrowband filter set including SII (S) 3nm, Ha (H) 3nm and OIII (O) 3nm filters.
Narrowband imaging can be done with the moon up or in heavy light pollution so you can make the most of every clear night.
Data from each narrowband filter can be combined to create a final colour image, a common combination is HOO using H-alpha for the red and OIII for the green and blue channels. It can also be useful to use H-alpha data blended into an RGB data set to enhance the contrast and structural detail whilst maintaining a natural look.
- H-Alpha 3nm Filter: The most popular narrowband filter allowing 3nm bandwidth of light centred on a wavelength of 656nm to pass through. Low transmission of other wavelengths of light specifically those produced by artificial light including mercury vapour, both high and low pressure vapour lights and unwanted natural light caused by neutral oxygen emission in our atmosphere (i.e.skyglow). Great choice for higher contrast and revealing subtle nebula details.
- OII 3nm Filter: Designed for observing / imaging nebulae allowing 3nm bandwidth of light to pass centred on a wavelength of 500nm which corresponds to the OIII emission line. Low transmission of other wavelengths of light, specifically those produced by artificial light including mercury vapour, both high and low pressure sodium vapour lights and the unwanted natural light caused by neutral oxygen emission in our atmosphere (i.e. skyglow). OIII emits at 495.9nm and 500.7nm which represents a blue-green colour. Many images of planetary nebula and supernovae remnants are taken with only H-Alpha and OIIII filters. They show great structural details with natural colours, similar to an RGB image.
- SII 3nm Filter: Designed for observing / imaging nebulae allowing 3nm bandwidth of light to pass centred on a wavelength of 672nm. Low transmission of other wavelengths of light, specifically those produced by artificial light including mercury vapour, both high and low pressure sodium vapour lights and the unwanted natural light caused by neutral oxygen emission in our atmosphere (i.e. skyglow).
Optolong 36mm unmounted LRGB filters
For broadband imaging imhabe this set of Optolong LRGB filters in my filter wheel, I don’t do an awful lot with broadband, but they are there is I need them, again I find them superb quality for the cost.
The Optolong LRGB Filter Set is designed for maximum contrast and with extremely high gradients for clear differentiation of colors. The LRGB filter set divides the spectrum into its components: red, green, blue and luminance. The OIII emission overlaps on blue and green filters with maximum transmission to allow high efficiency and natural color imaging. The gap between green and red filters serves to block out the primary Sodium (Na) light pollution line at 589nm and improves color balance and separation.
- Multi-layer anti-reflection coated.
- Precise and homogeneous coatings ensure high values of desired passband and blocking of unwanted offband.
- ltra-thin filter cell to minimize vignetting; clear optical aperture of 36mm.
- Precision CNC-machined metal filter cell with sand blasted black anodized finish, anti-reflection treatment, and laser engraving.
- Works well with delayered monochrome CCD cameras. Suitable for deep sky and planetary CCD imaging.
- Blocks out infrared wavelengths (700-1100nm) so a separate IR cut-off filter is not required for imaging applications.
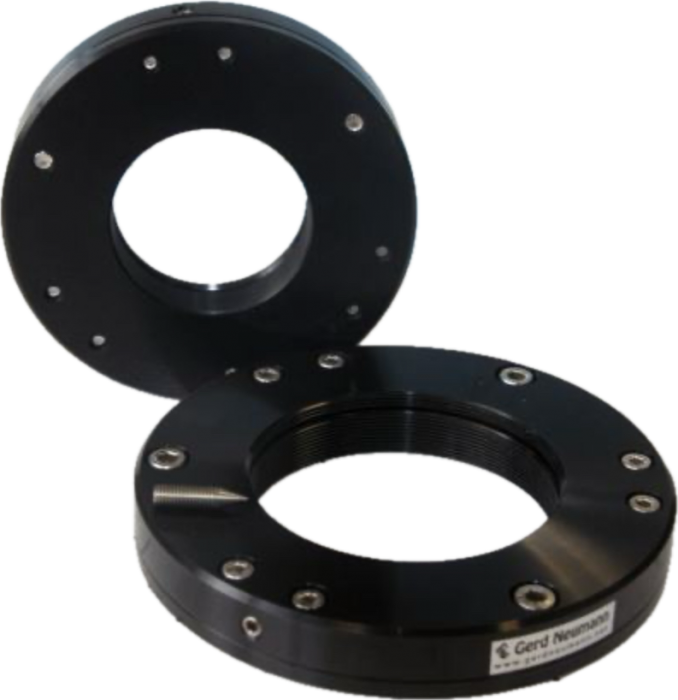
Gerd Neumann Tilt Adjuster
A very common issue these day is tilt in the imaging train and it can cause a real issue with your images, manifesting as elongated stars on the outer edges of your images, and can be very hard to get rid of. so I bought this superb tilt adjuster which sits in front of my filter wheel.
see my YouTube video on tilt adjustment with a laser and an adjuster like this one, easy to do in the daytime.
The Neumann CTU allows you to adjust the tilt of the focal plane very easily and very precisely. Similar units from other manufacturers have three pairs of push-pull screws at 120° and can be very difficult to adjust. Push/Pull screws are much too coarse and a lot of adjustment is done via elastic or even plastic deformation of the main body to achieve the required image plane movements.
In contrast, at the heart of the Neumann CTU are three radial screws with a very light cone shape formed at one end. By screwing these cones in, the two parts of the Neumann CTU are separated by a very small amount. A whole turn of a screw corresponds to a separation of only 0.2mm. Due to this fine movement and the large outer diameter of the Neumann CTU it is quite easy to adjust the position of the sensor to less that 1/100mm.
